September 2015
Excel Vlookup using TRUE
Monday, September 28th, 2015
Written by Jane Hames
This guide is aimed at Excel users who can already use the VLookup function and want to learn more about it. This is how to use the Excel Vlookup using TRUE
If you use a VLookup, the chances are you will use FALSE as the Range Lookup finding an exact match for the Lookup Value in the first column of your Table Array. I often get asked when you would use TRUE as your Range Lookup and this is good question as it’s not used half as often as FALSE.
Last week I was able help one of my Excel course delegates to solve a problem she had, and the solution to the problem was to use a Vlookup with TRUE. I wanted to share what we did with my readers and followers as it might give you some good ideas of things you could do with your own work. All data in the guide below is fictional, but based on the real world scenario:
The scenario I was given, is that as shown in the image below, there are a list of date ranges with different exchange rates for different date ranges.
We wanted to ensure that the correct exchange rate was used to calculate the payment amount in Euros as shown in the image below: In order to do this, I used a Vlookup to pick up the correct exchange rate for the specified payment date. This payment date would need to sit in one of the date ranges listed. This is what we used to do this calculation:
LOOKUP_VALUE: The payment date 
TABLE_ARRAY: The table which shows the date ranges listed in ascending order (the Date From in the first column of the table_array is what Excel will use). The exchange rate is in the third column of the table_array.:
COL_INDEX_NUMBER: 3 This is the column in the table_array that contains the exchange rate we are looking for.
RANGE_LOOKUP: TRUE This ensures that Excel will look at the earliest date in the list that is close to the payment date (our lookup_value).
This what the formula looks like at the end:
Note that the payment date is shown as its reference number rather than the date. This is because I have selected SHOW FORMULAS in order to show you the formulae on the sheet. I then copied the formula down so that I have ended up with this end result:
If you would like help with the Vlookup or other functions in Excel, please get in touch.
-->Written by Jane Hames
This guide is aimed at Excel users who can already use the VLookup function and want to learn more about it. This is how to use the Excel Vlookup using TRUE
If you use a VLookup, the chances are you will use FALSE as the Range Lookup finding an exact match for the Lookup Value in the first column of your Table Array. I often get asked when you would use TRUE as your Range Lookup and this is good question as it’s not used half as often as FALSE.
Read more on Excel Vlookup using TRUE…
Need to remove underline from hyperlinks in PowerPoint? Here’s an easier alternative
Thursday, May 21st, 2015
Written by Jane Hames
Need to remove underline from hyperlinks in PowerPoint? Here’s an easier alternative
If you have added a hyperlink to text in PowerPoint, the default theme will make it blue and underlined. I often get asked how to change this, and one option is to create your own theme with a custom colour scheme. The alternative I am going to guide you through is often more popular with the people I meet on training as it is a bit quicker and easier than creating a custom theme.
Here’s what a hyperlink on text looks like when using the default theme and colour scheme: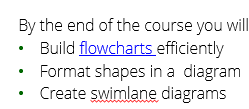
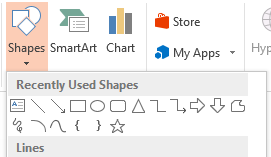
So, if you need to remove underline from hyperlinks in PowerPoint, you may want to consider inserting a shape next to the text and turn that into a hyperlink (The shape could be made invisible on the slide if required). Here’s how:
- From the Insert tab on the ribbon, select Shapes and click on the shape you want to draw.
- Click and drag to draw the shape on your slide.
- Move over the middle of the shape add drag it to move it if required.
- Click on the shape (if it is not already selected) and then from the Insert tab on the ribbon, choose Hyperlink.
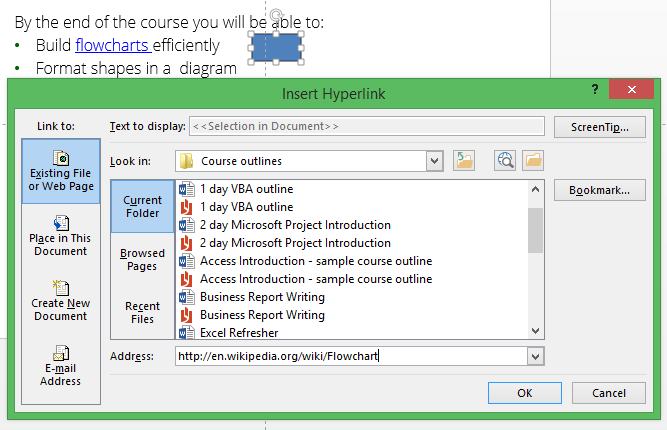
- Navigate to the file you want to link to or copy and paste a link to a webpage into the Address box.
- Click on OK.
- To format the shape, click on it and go to the Drawing tab on the ribbon.
- Choose your required colour and outline from the Shape Fill and Shape Outline buttons.
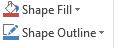
Tip: You could make the shape invisible by choosing No Fill and No Outline, or something very pale so that only the presenter is aware of the shape. When running the slide show in Slide Show view, you will see the hyperlink hand shape when you move over the shape so you can just click to follow the hyperlink.
-->Written by Jane Hames
Need to remove underline from hyperlinks in PowerPoint? Here’s an easier alternative
If you have added a hyperlink to text in PowerPoint, the default theme will make it blue and underlined. I often get asked how to change this, and one option is to create your own theme with a custom colour scheme. The alternative I am going to guide you through is often more popular with the people I meet on training as it is a bit quicker and easier than creating a custom theme.
Read more on Need to remove underline from hyperlinks in PowerPoint? Here’s an easier alternative…
Easy ways to prepare to get the most from your training
Wednesday, May 20th, 2015
Written by Jane Hames
When you have a busy workload, giving up a day or two to attend training can sometimes be a struggle and to prepare for the training doesn’t always make it to the top of the priority list. The tips I will share with you here really won’t take much time at all. Just a little bit of investment will enable you to get the best you can from your course.
As an IT trainer, I do find that, once people are in the swing of the training they are always pleased to have given up their time to come along. The main reason for this is that they very quickly realise how much time they will save and how much more value they will be able to get out of their work. (The idea of gaining a reputation for being “good at the software” is often a motivation too!)
Is just turning up and hoping for the best going to enable you to really achieve your objectives. Do you even know what the course is about yet or have you “been sent”? Here are a few things to think about prior to the training (even if the only time you’ve had is on your journey there). Having answers to these questions will ensure you get the most from the day and that your trainer can properly cater to your needs.
1. What are your objectives?
- Unless you know exactly what you need to learn, this could seem quite a vague question, so here’s an example that might help you answer it. Let’s say you are going to attend an Excel course. You have dabbled with Excel, but it takes ages and you don’t feel confident that you are getting things right. You could save a copy of one of your workbooks (or colleague’s workbooks) to show to the trainer. Even in a group training course, a good trainer will find time to have a look at you work and advise you on it.
- Write a list of things you aren’t confident with.
- Think about all the things you can do so far this will be really useful information for the trainer.
- Maybe a colleague has said, “oh you definitely need to learn PivotTables”. Your colleague might be right, but focussing on one feature might mean that you overlook the benefits of some other features that the trainer is going to show you.
- Bear in mind, you might not know what you don’t know, so be open minded as it might be a combination of features that will enable to you to acheive these objectives.
- Be prepared to think creatively and work with your trainer to find solutions to your problems. There’s not always an instant answer to a problem, but a bit
of troubleshooting and some creative work arounds, you should hope to get where you need to be. - Have a big picture idea of what you would like to be better at. Your objectives might be to improve your overall way of working. Objectives don’t have to be a list of features!
2. Do you know how you want to develop your skills both short and long term?
- Things can change so quickly in the world of work, so it might that in short term you want to able to do X, Y & Z. It might be worth thinking how you want to develop your skills, as an individual in your current job and also within your current team and organisation. Perhaps you have a long term career plan – your trainer might be able to advise you on the next steps for your learning.
3. Does your manager or organisation have some plans for your development that aren’t clear to you?
- Sometimes, I work with people who tell me that their manager has “sent” them on the training, but they don’t really know why. If that’s you, ask your manager what they have in mind and what THEIR objectives are. This might help you to determine your own objectives. If you have an unapproachable manager, just bear in mind that being proactive about finding out why you are attending the training will result in a huge benefit to your manager as you can then focus on achieving what will be required of you. It should be a win win as you can feel motivated to acheive what you need and your manager knows that you are taking it seriously. A good manager will have already talked to you about the training and got your input and I know this is more often the case!
Most importantly – training should be enjoyable! At Glide Training we aim to make it a great day that is highly productive and leaves you full of confidence and enthusiasm. We hope to see you soon and if you have any questions about what training is best for you, we would love to have a chat about it, so please do give us a call.
Written by Jane Hames
When you have a busy workload, giving up a day or two to attend training can sometimes be a struggle and to prepare for the training doesn’t always make it to the top of the priority list. The tips I will share with you here really won’t take much time at all. Just a little bit of investment will enable you to get the best you can from your course.
Read more on Easy ways to prepare to get the most from your training…
Turn a positive number into a negative in Excel using Paste Special
Wednesday, April 29th, 2015
Written by Jane Hames
Turn a positive number into a negative in Excel using Paste Special
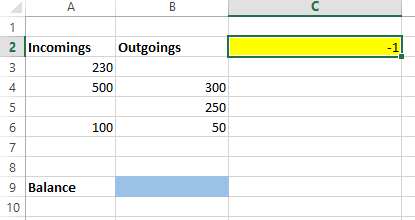
During Excel training last week, I was asked how to turn a positive into a negative in Excel. The Excel user was calculating balances but the expenses came in form Sage as positive values, whereas they needed to be negative values.
The ABS function can be used to turn a negative into a positive (see how to do that here). To turn a positive into a negative you can use Paste Special. This is what we did:
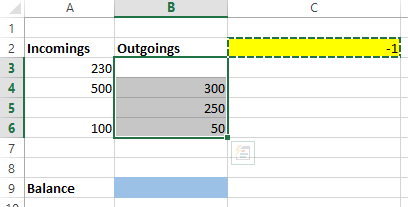
- Starting with a sheet laid out a bit like this example, type -1 (in yellow here) somewhere on the sheet. This -1 will be used to multiply our positive numbers by minus 1.
- Highlight the cell with -1 in it.
- Select copy.
- Highlight the cells to be changed into negative values. (You should still have the dotted outline showing around the -1 cell to indicate that this cell has been copied.)
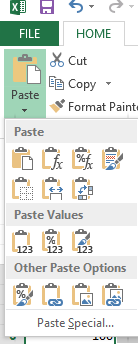
- Select Paste Special from the arrow on the Paste button on the Home tab.
- From the Paste Special box, select Multiply, then click on OK.
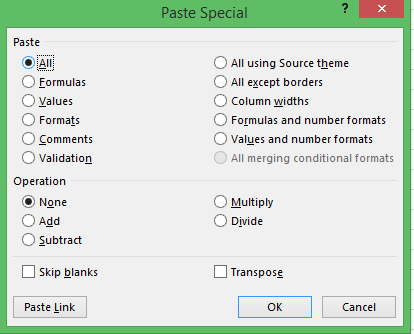
- Your positive numbers are now negative.
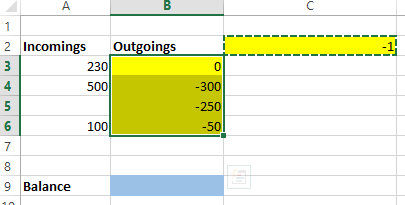
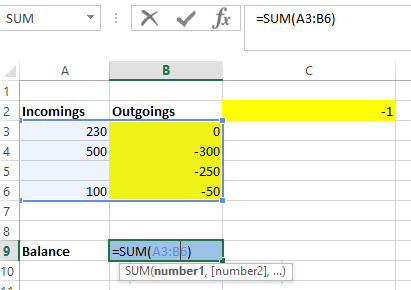
- I finished this off by calculating the sum of my incomings and outgoings to give me the balance.
Excel training is the most commonly requested subject at Glide Training. We have helped hundreds of people to become more efficient and to enjoy their Excel use.
Written by Jane Hames
Turn a positive number into a negative in Excel using Paste Special
During Excel training last week, I was asked how to turn a positive into a negative in Excel. The Excel user was calculating balances but the expenses came in form Sage as positive values, whereas they needed to be negative values.
Read more on Turn a positive number into a negative in Excel using Paste Special…
Microsoft Outlook Shortcut Keys
Tuesday, April 21st, 2015
Written by Jane Hames
Microsoft Outlook Shortcut Keys
When delivering training courses, the particpants are often very keen for me to share keyboard shortcuts with them. The invention of the touch screen does not seem to have reduced requests for help with saving time using keyboard shortcuts. I find that Outlook shortcut keys are not commonly known, so here’s a few that should save a bit of time. Have a practise of these as soon as you can so they they become embedded in your mind…they’ll soon become second nature!
- Switch to Mail press CTRL + 1

- Switch to Calendar press CTRL + 2

- Switch to Contacts/People press CTRL + 3

- Switch to Tasks press CTRL + 4

Outlook can be used for so much more than just sending emails. Why not give as a call discuss some Outlook training for you, your team, or find ways to improve the way your organsation as a whole communicates with this great tool.
Written by Jane Hames
Microsoft Outlook Shortcut Keys
When delivering training courses, the particpants are often very keen for me to share keyboard shortcuts with them. The invention of the touch screen does not seem to have reduced requests for help with saving time using keyboard shortcuts. I find that Outlook shortcut keys are not commonly known, so here’s a few that should save a bit of time. Have a practise of these as soon as you can so they they become embedded in your mind…they’ll soon become second nature!
Read more on Microsoft Outlook Shortcut Keys…
Reset a PowerPoint Slide to its Slide Master Settings
Monday, April 6th, 2015
Written by Jane Hames
Reset a PowerPoint Slide to its Slide Master Settings
If you have edited the formatting of a PowerPoint slide individually you may have detached it from its slide master. This means that it will be inconsistent with other slides. Also, if you change the formatting on the slide master, the changes may not be carried through to this slide. You can reset a PowerPoint slide to its slide master settings. Here’s how:
- Ensure that you are on the slide that has been detached from its master.
- Click on the reset button button on the Home tab of the ribbon

Written by Jane Hames
Reset a PowerPoint Slide to its Slide Master Settings
If you have edited the formatting of a PowerPoint slide individually you may have detached it from its slide master. This means that it will be inconsistent with other slides. Also, if you change the formatting on the slide master, the changes may not be carried through to this slide. You can reset a PowerPoint slide to its slide master settings. Here’s how:
Read more on Reset a PowerPoint Slide to its Slide Master Settings…
How to copy formatting in Excel, Word and PowerPoint using the Format Painter
Monday, April 6th, 2015
Written by Jane Hames
How to copy formatting in Excel, Word and PowerPoint
I regularly want to copy formatting in Excel, Word or PowerPoint but rather than having to carry out the same formatting steps again, I use the Format Painter. This is a quick and easy tool to use, you just to need to know about it and then remember to use it.
- Highlight/select the text, cells or shape that has the formatting you want to reapply elsewhere.
- Click on the Format Painter button on the Home tab of the ribbon

- Highlight/select the text, cells or shape you want to copy the formatting to.
Tip: In step 2, if you want to be able to copy the formatting to more than one area, double click on the format painter. You will then to remember to click on it again to switch it off once you have finished.
-->Written by Jane Hames
How to copy formatting in Excel, Word and PowerPoint
I regularly want to copy formatting in Excel, Word or PowerPoint but rather than having to carry out the same formatting steps again, I use the Format Painter. This is a quick and easy tool to use, you just to need to know about it and then remember to use it.
Read more on How to copy formatting in Excel, Word and PowerPoint using the Format Painter…
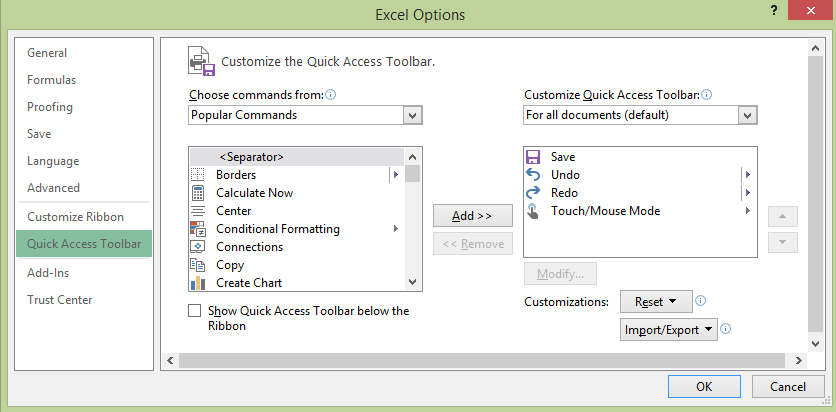
Customise the Toolbar in Word, Excel, PowerPoint, Outlook (Quick Access Toolbar)
Thursday, March 19th, 2015
Written by Jane Hames
Customise the Toolbar in Word, Excel, PowerPoint, Outlook
The toolbar in Word, Excel, PowerPoint, Outlook or other Microsoft Office programs is called the Quick Access Toolbar. It contains a few buttons ready for you to use, but it can be customised to include other things that you use frequently.
The quickest way to do this is:
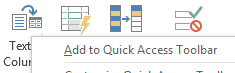
- Find the button on the ribbon that you want to add.
- Right click on a button and choose Add to Quick Access Toolbar
Another method is:
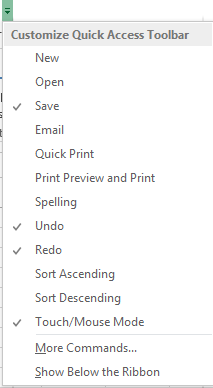
- Click on the arrow on the right hand end of the Quick Access Toolbar
- Select an option form the list to add it the toolbar or if the option is not there, click on More Commands
- From the Choose Commands From drop down list, select the category to look in.
- Click on the option you want to add to the toolbar and then click on the Add button to add it to the Quick Access Toolbar.
- Click on OK.

Written by Jane Hames
Customise the Toolbar in Word, Excel, PowerPoint, Outlook
The toolbar in Word, Excel, PowerPoint, Outlook or other Microsoft Office programs is called the Quick Access Toolbar. It contains a few buttons ready for you to use, but it can be customised to include other things that you use frequently.
Read more on Customise the Toolbar in Word, Excel, PowerPoint, Outlook (Quick Access Toolbar)…
Excel Number Formatting For International Users
Tuesday, March 10th, 2015
Written by Jane Hames
Excel number formatting for when working with users with a different international format
As often happens during Excel training, recently a question came up that I had not been asked before. The way people use Excel is so personal to their own style, the type of work they do and what their organisation does, so I love it when a question is asked that enables me to do some troubleshooting and experiment with new ways of working.
The question this time, was from an Excel user who works in the UK and – as we do here – uses a comma to separate thousands and a dot as the decimal place. The user was receiving workbooks from colleagues elsewhere in Europe where they were using a dot to separate the thousands and a comma instead of a dot for decimals. So, as you can imagine the user was getting very frustrated and even had to resort to re-typing the numbers!
My challenge was to solve this problem, and this what I did:
- This is what I was starting off with:

- Select the cells containing the numbers with the commas and dots in the wrong place.
- From the Home Tab, click on the Find & Select button

- Choose Replace and type a dot in the Find what box and leave the Replace with box blank.
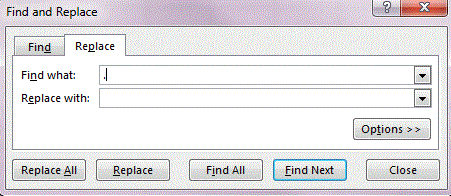
- Click on Replace All to replace all dots in the selected cells with nothing.
- From the Find and Replace box, now type a comma in the Find what box and type a dot in the Replace with box.
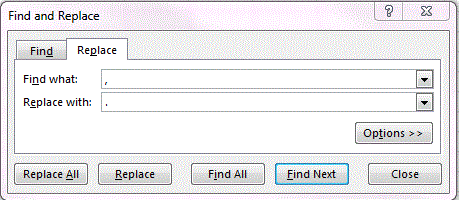
- Click on Replace All to replace all commas in the selected cells with a dot.
- Click on the close button.
- Now format the selected cells with Comma Style formatting by clicking on the Comma Style button in the Number group of the Home Tab.

Written by Jane Hames
Excel number formatting for when working with users with a different international format
As often happens during Excel training, recently a question came up that I had not been asked before. The way people use Excel is so personal to their own style, the type of work they do and what their organisation does, so I love it when a question is asked that enables me to do some troubleshooting and experiment with new ways of working.
Read more on Excel Number Formatting For International Users…