Written by Jane Hames
I have posted a how-to guide about slicers before, but Excel Pivot Tables are such a popular tool for data analysis and people can become a bit attached to them!
Using the Excel Pivot Table Slicer with Groups
On a recent Advanced Excel training course, I was asked by a buying assistant how to use a slicer to filter based on a date. However, instead of the actual date of the order, they want to be able to filter on the month, quarter or year without the date, month, quarter or year being displayed in the Pivot Table.
I love to solve these kind of problems, and with a bit of creative thinking and our trusty slicer tool, this is what I came up with:
Ensure that you are working in the latest Excel format (if you are in Compatibility Mode, you will not be able to use Slicers).
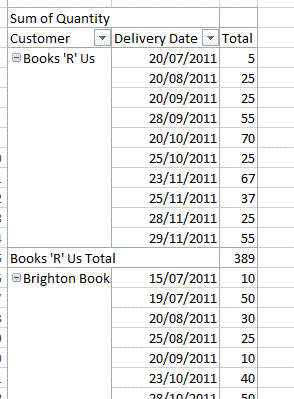
- Create your PivotTable with a date field in the row area. Mine looks like this:
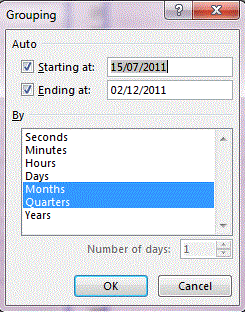
- Click on the Group button.

- Select two groups such as months and quarters or quarters and years. (You need to create two groups in order to have the second one appear as a field in the field list.) Our Slicer will be based on this second field in the following steps.
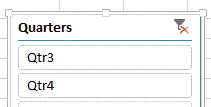
- Refresh the Pivot Table and click into the date field on which you wish to base the Slicer. (I clicked into the Quarters field.)
- Click on the Insert Slicer button.
![]()
- On the Slicer, select the item to filter by (I clicked on the Quarter I was interested in).
- You can now use the field list to remove the date fields from the PivotTable if required. Your second “group by” field will still be available in the field list, so you can still use its Slicer.